Please click here to open the article in a new window.
INHALTSVERZEICHNIS
- General information
- Adjust shortlist header
- Configure shortlist settings
- Design
- Shortlist & Longlist settings
- Create a new shortlist setting
- Shortlist preview
- Send to customers via email
- Shortlist External access log
General information
Shortlist refers to online project viewing. This allows customers to view the status of a project directly and live via an individual link
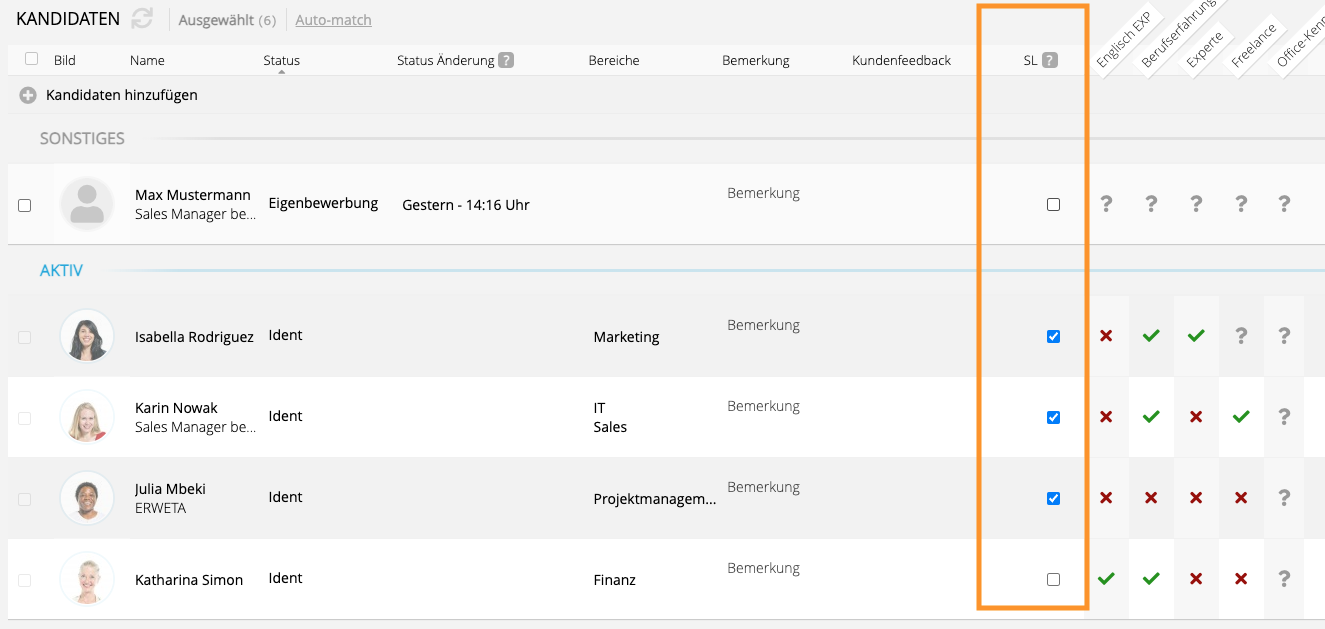
ll candidates who are actively marked in the SL (=Shortlist) column in the candidate table in a project are presented on the shortlist. Candidates who have the candidate status “Cancelled” in the project will not be displayed on the shortlist.
Starhunter offers the option of determining both the sorting order of the candidates and the column contents (age, salary information, etc.) individually on the shortlist.
In addition, you can use different design options for the shortlists to make your presentations visually appealing and also have the option to customize the display of the content on the shortlist for different projects individually.
The functionality behaves analogously for the longlist (paid add-on).
Adjust shortlist header
The header of the shortlist (see below) is fed by various content from the system, which you can customize in Starhunter.

Customizine company data & company logo
You will find your company details on the right-hand side. You can adjust these under Settings > Basic data.
In the “Profile picture” field (Settings > External Views) you have the option to upload a company logo. For designs with a white background, you can upload the company logo on a white background accordingly. If you would like to use the dark “Slate” design (see below), we recommend integrating your logo with a transparent background so that the display is visually uniform. When using the dark design with a logo based on a white background, the display is not visually uniform (see below).
Change customer details & logo
All customer related data is on the shortlist on the left side of the header.
On the one hand, you can change the customer's logo in the project by hovering over the suitcase icon in the top left of your project in Starhunter.
The image can be copied from the clipboard or uploaded via "Change Image". Alternatively, you have the option to customize the logo directly in the respective customer in the same way. To do this, click on the customer within the project (see below) and proceed in the same way.
The change is mirrored in both directions, i.e. a customer logo is used for a customer, which is valid for all projects that affect the customer.
Your customer's address data is taken from the contact person linked at the top (first) position in the project.
Likewise, the first (top) address of the contact person (see below) is displayed on the shortlist.

If you maintain the contact person's private address, we recommend that you integrate the customer address as the top address.
If no address is specified in the contact person, the system uses the customer's first (top) address. The customer's telephone number and email address are not shown on the shortlist.
Configure shortlist settings
You can make all individual settings that affect the shortlist by selecting “Settings” from the main menu and then navigating to “External Views”.
Shortlist default settings
In this field you can specify which of the individually created configurations are the default as soon as you have created a new project.
Of course, a different setting can be selected at any time in the project itself. If you have not made any changes initially, the shortlist will be displayed in the Starhunter standard setting.
Default setting (from left to right)
- Candidate (Kandidatenname und Bild sind sichtbar)
- Status (the current candidate status within the project)
- Comment
- Requirements for candidates
- Current Salary (actual salary of the candidates)
- Salary Requirements (salary expecation)
- Notice Period
- Location (top entry of the city in the candidate's address area)
The standard setting shows the candidates' pictures, the candidate profile and files that are released for download and allows comments on candidates and project feedback. Once you select and save an option under Columns, the default column setting is discarded.
Design
The first impression counts. That's why we've completely overhauled the visual appearance of the Shortlist to offer you more professionalism and customization options. Use the new shortlist design options to make your presentations visually appealing.
In the "Design" field you can choose from different variants, each of which differs in font, size, formatting or color, and the buttons for downloading files or writing comments also vary visually.
The majority of the designs are in a light display, with "Slate" you will find an alternative that is similar to a dark mode. The design you choose in the "General" category applies to all individually created shortlist settings.
Design preview
You can use the “Preview” button to get an impression of the respective design before you decide. You can easily navigate between the designs using the up and down arrow keys. Under MacOS, after navigating, you have to confirm the design change again with the Enter key.

Select files
You have the option of uploading a CSS file via “Select files”. The design is based on the Bootstrap Framework (version 5.3). Please note that you are responsible for creating and functionally testing your individual designs.
Shortlist & Longlist settings
This table provides an overview of all individually created shortlist settings. Each setting can be opened, edited or deleted by clicking on it.
The decision as to what information you want to disclose to your customers is entirely up to you and can be determined using various shortlist configurations (e.g. a shortlist with salary, without salary, with the candidate's age or without information, etc.). Die Entscheidung, welche Informationen Sie Ihren Kunden preisgeben möchten, liegt ganz bei Ihnen und kann mittels verschiedener Shortlistkonfigurationen (z.B. eine Shortlist mit Gehalt, ohne Gehalt, mit Altersangabe des Kandidaten oder ohne Angabe etc.) festgelegt werden.
In project For your individual use case, you have the option to configure a separate shortlist setting that makes this possible.
Example: Shortlist with salary information
For project x, the salary information of the candidates on the shortlist should be shown to the customer.

Example: Shortlist without salary information
In project Y, the visibility of salary information should be omitted.
In every Starhunter project you can access all of the shortlist configurations individually created in the “Shortlist / Longlist Settings” table mentioned above.
To do this, first open the expandable “Settings” category in the desired project. In the "Configuration" area a little below you can access all individually created shortlist configurations by clicking in the "Shortlist Configuration" field.
Now select the desired shortlist configuration that should be valid for this project from the drop-down selection and save the setting. By clicking on the link (see red arrow) you will go straight back to the setting options for the shortlist.

Create a new shortlist setting
Below the "Shortlist / Longlist Settings" table you can create a new shortlist setting.
- Click on ‘Create new Settings’
- Enter a title for your configuration under "Name"
- Save using the checkmark or alternatively using the shortkey with STRG + S (Windows) or CTRL + S (MacOS)
Tip:
In order to maintain an overview of the configurations created, we recommend that you prefix the respective employee abbreviation in addition to an appropriate name, e.g. “JS_Shortlist with salary”. In this way, you always have an overview of the views created by the team within the team, if the should resemble general names.
Configure columns and buttons
In the "Settings" category you can specify whether and which content should be displayed in what order for the newly created shortlist configuration. Unless you make a change in the "Columns" field, the Starhunter default setting above applies.
Individual setting of the columns
In the "Columns" field you have the option of selecting from a wide range of candidate information (e.g. age, industry, actual salary, etc.) and sorting it in any order via drag & drop on the shortlist (from left to right).

The configuration is applied as soon as the changes for this setting have been saved. Individual setting of the columns
Checkboxes (candidate profile, picture, files, comments, feedback)
The setting can be personalized in even more detail using various checkboxes. By default, the candidate image is displayed to the left of the name, and access to the candidate profile and the download of shared files are also possible. Project feedback and the writing of individual comments (see below) for the respective candidates are also permitted.
The visibility of this content can be controlled using the checkboxes under "Columns" (see below).
The “Show companies on anonymous list” checkbox prevents the current company of the candidates on the anonymized shortlist from being displayed.
Anonymizing the shortlist can be set individually within each project by selecting and saving the selection "Hide candidate names" in the "Candidate anonymity in short/longlist" field under "Settings".
All of these settings can be made using the checkboxes. Below is an example of a setting that prevents the ability to view the candidate profile, download files or write comments.
Sorting the candidates on the shortlist
Aside from the column contents and checkboxes, the sorting of candidates on the shortlist can be configured. This can be selected in the “Sorting type” field.
No sorting
If "No sorting" is selected, the system default is used.
Manually
If the selection “Manually” has been made, it must first be saved. Then please navigate to the project in which you would like to manually sort the candidates on the shortlist and select your new shortlist setting under Settings > Configuration > Shortlist Configuration (see below) and save.

The new column SL order for sorting (see below) will then be visible in the candidate table in the project.
There you can sort the candidates individually in numerical ascending order of priority, depending on how you would like to present them to the customer. Below is the result of the sorting shown above.
Sort by columns
Once this selection has been made, the candidates are sorted according to column content. The specification for this is made in the sorting by columns table below (see below).

The sorting hierarchy is based on the sorting column. Using this setting as an example, the first sorting criterion is the last name, which is sorted in ascending order by default. The candidates are then sorted in ascending order according to the following criterion, in this case age. The last criterion is the actual salary, which is sorted in descending order.
Shortlist preview
In each project there is a Shortlist button above the candidate table.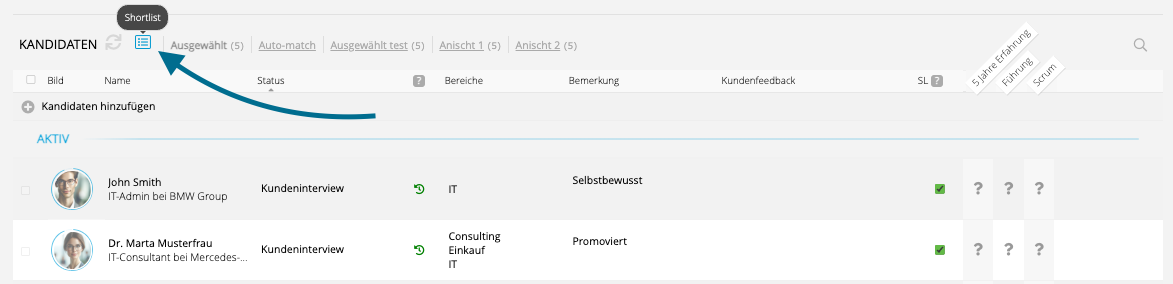
When you click on this button, a preview (see below) of the currently configured shortlist setting for the selected project opens in a pop-up window.
Within this preview you can change various settings directly. In the Language field you can choose between German and English. In Shortlist Configuration you can access the same drop-down selection as in the project without having to close the window. The same applies to the anonymization of the shortlist, which you can do by selecting "Hide candidate names" in Candidate anonymity in short/long list.

Send to customers via email
You can use the button of the same name to send the link to the shortlist. The email pop-up that opens contains a placeholder that, once sent, creates the link for the customer to access the shortlist. Select the addressee from the system and write an individual text. In order for the link to the shortlist to work, no changes must be made to the placeholder %project.short-list%.
Tip:
Create an email template with individual text and insert the placeholder that generates the link to the shortlist. This way you save time and simply select the appropriate email template before sending and can make specific changes if necessary.
Shortlist External access log
Below the status history in the project you will find the table “External access history.”. This can also be accessed by clicking under the point of the same name in the quick jump bar on the left.
All calls to the shortlist itself as well as the calls to the respective candidate table are logged in this table with the respective access time (date and time) and the associated IP address. As usual, the table itself can be filtered so that you can see at any time whether your customer has already viewed the shortlist or the associated candidates. If you would like to know whether a particular candidate has already been viewed, you can filter this within the table (see below).
Was this article helpful?
That’s Great!
Thank you for your feedback
Sorry! We couldn't be helpful
Thank you for your feedback
Feedback sent
We appreciate your effort and will try to fix the article